

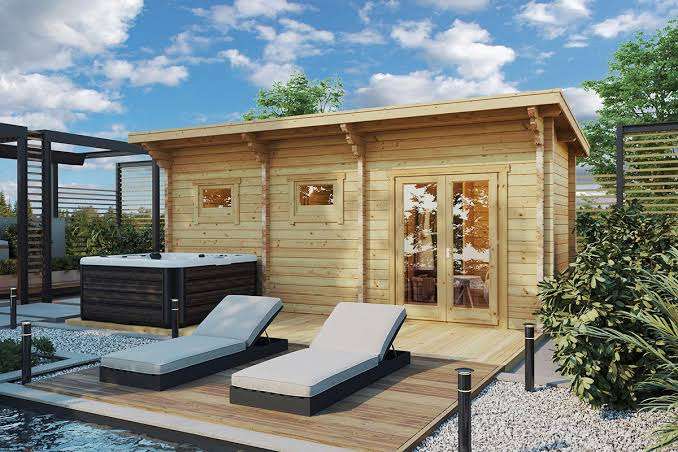

Understanding Outdoor Sauna Construction
Building an outdoor sauna can transform an ordinary backyard into a comfortable personal retreat where you can relax, enjoy quiet time, and create a dedicated wellness space at home. Unlike an indoor sauna, an outdoor model must withstand changing weather conditions, moisture, temperature fluctuations, and exposure to the surrounding environment. Successful construction starts with choosing the right location, deciding on the size, selecting durable materials, and understanding the heating system you intend to install. Careful planning can also help control costs and prevent problems with drainage, ventilation, insulation, and electrical connections. Whether you are considering a compact sauna for one or two people or a larger structure for family use, understanding the major construction requirements before purchasing materials will help you make practical decisions and create a sauna that fits your property.
Outdoor Sauna Building Plans and Essential Design Decisions
When researching Outdoor Sauna Building Plans, homeowners should begin by deciding how the sauna will be used, how many people it needs to accommodate, and how much outdoor space is available. These decisions influence the dimensions of the structure, bench arrangement, heater capacity, door placement, insulation requirements, and overall construction budget. A small sauna may be suitable for personal relaxation, while a larger cabin can provide more seating and room for movement. It is also important to determine whether the structure will be freestanding, placed on an existing suitable foundation, or incorporated into a larger backyard project. Before construction begins, review local building regulations, property boundaries, fire-safety requirements, and any permits that may apply. A well-planned design balances comfort, durability, safe operation, and the practical limitations of your property.
Choosing the Best Location in Your Backyard
The location of an outdoor sauna affects its accessibility, privacy, durability, and long-term maintenance needs. Ideally, the structure should be placed on a stable area with suitable drainage and enough room for safe entry, ventilation, and maintenance access. Avoid locations where rainwater regularly collects or where runoff from roofs and nearby slopes could reach the foundation. Consider how far the sauna will be from the house, outdoor seating areas, and electrical connections, while also maintaining the clearances required by the heater manufacturer and local regulations. Trees can provide shade and privacy, but overhanging branches may drop leaves, needles, or debris onto the roof. It is also helpful to think about pathways during wet or cold weather. Choosing the right location early can reduce future landscaping work and make regular sauna use more convenient.
Selecting a Suitable Foundation
A dependable foundation supports the weight of the sauna, helps keep the structure level, and reduces problems caused by ground movement or moisture. Depending on the design and site conditions, possible foundation options include a properly prepared gravel base, concrete slab, concrete piers, or other engineered support systems approved for the structure. The correct choice depends on soil conditions, frost depth, drainage, cabin weight, and local building requirements. The foundation should support the entire structure according to the manufacturer’s or designer’s specifications, rather than relying on uneven ground or loosely placed blocks. A suitable moisture barrier and appropriate separation between the wooden structure and the ground can help reduce deterioration. Before pouring concrete or installing supports, confirm the dimensions and placement of the cabin so that the foundation aligns with the walls, door, and planned utility connections.
Creating a Practical Sauna Layout
A practical layout makes the sauna comfortable to use and helps ensure that heat is distributed appropriately throughout the interior. Begin by deciding how many people will use the cabin regularly and how much seating space each person needs. Bench depth, seating height, ceiling height, door position, and the location of the heater all affect the available interior space. Avoid making the cabin larger than necessary because additional volume can increase heating requirements and material costs. At the same time, an interior that is too cramped may feel uncomfortable and limit movement. The layout should also account for safe access to the exit and the clearances required around hot equipment. Sketching the floor plan before purchasing materials allows you to identify potential conflicts and make changes before construction becomes expensive or difficult to modify.
Choosing Durable Wood for Outdoor Construction
Wood selection is particularly important for an outdoor sauna because the exterior faces rain, sunlight, temperature changes, and seasonal moisture. Common choices for sauna construction include cedar, spruce, hemlock, and other suitable timber species, depending on local availability and the intended application. The best choice depends on durability, stability, appearance, cost, and the manufacturer’s recommendations. Exterior cladding needs to be appropriate for outdoor exposure, while interior wood should be suitable for repeated heating and contact with users. Lumber should be properly graded and installed according to the construction design, with attention to moisture content and movement as temperatures and humidity change. Wood intended for exterior protection should not automatically be used for interior benches or surfaces that become hot. Selecting appropriate materials for each part of the structure can improve comfort, reduce maintenance, and help the sauna last longer.
Planning the Wall and Roof Structure
The walls and roof protect the sauna from the elements while supporting the insulation and interior finish. A typical timber structure includes framing, exterior cladding, a suitable weather-resistant layer, insulation where required, and an interior finish designed for sauna conditions. The exact wall assembly should be selected according to the climate, cabin design, and applicable building standards. Roof construction deserves particular attention because rain, snow, and standing moisture can damage an inadequately protected structure. Choose roofing materials suitable for the local weather and make sure the roof has the required slope, flashing, and drainage details. Doors and windows should be installed using methods that limit unwanted water entry and maintain the intended thermal performance. Following a tested design or working with an experienced builder can help prevent condensation, leaks, and other problems that may be difficult to correct after the interior is finished.
Insulation and Heat Retention
Proper insulation can help an outdoor sauna reach its intended temperature more efficiently and reduce unnecessary heat loss. The appropriate insulation type and thickness depend on the wall and roof construction, climate, heater specifications, and building design. Insulation should be installed carefully so that gaps do not create unwanted thermal bridges or allow excessive heat to escape. Sauna assemblies also require appropriate control of moisture and water vapour, using materials and installation methods designed for the particular system. Incorrect layering can trap moisture within the walls, potentially contributing to mould, wood deterioration, or reduced insulation performance. Because hot sauna environments differ from ordinary rooms, homeowners should follow a proven sauna construction specification rather than simply copying a standard garden shed design. Planning the complete wall and ceiling assembly before construction is more reliable than attempting to add insulation after the cabin has been completed.
Understanding Sauna Ventilation Requirements
Ventilation is essential because it helps manage air quality, supports comfortable use, and contributes to the way heat circulates inside the sauna. The placement and size of air inlets and outlets depend on the heater type, cabin layout, and manufacturer’s instructions. Traditional sauna systems may require a specific arrangement of fresh-air intake and exhaust openings, while other designs may use different ventilation strategies. Airflow should not be improvised by randomly cutting holes into a finished wall, because poorly placed openings can affect heating performance and user comfort. Ventilation also needs to work with the overall building envelope so that moisture does not accumulate in unsuitable areas. Review the sauna manufacturer’s guidance or consult a qualified designer before finalizing the vent positions. Correct ventilation helps create a more comfortable environment and supports the long-term performance of the cabin.
Choosing Between Electric and Wood-Burning Heaters
The heater is one of the most important decisions in an outdoor sauna project because it influences installation requirements, operating costs, maintenance, and the overall experience. Electric sauna heaters are convenient for many homes because they offer controlled temperature settings and do not require storing firewood. However, the electrical supply must be compatible with the selected heater, and installation should be completed by a qualified electrician. Wood-burning heaters can appeal to people who prefer a traditional fire-heated experience, but they require appropriate chimney components, combustion air, clearances, and compliance with local fire and emissions regulations. Both options must be correctly sized for the sauna’s interior volume and construction characteristics. Before choosing a heater, check the manufacturer’s specifications, installation requirements, service availability, and local restrictions that may affect the type of system you can use.
Planning Electrical Connections Safely
Outdoor electrical installations must be designed to withstand the environmental conditions where the sauna will be located. A heater may require a dedicated circuit, specific wiring, protective devices, and a supply capable of supporting its rated electrical load. The exact requirements vary by heater model and local electrical code, so homeowners should not assume that an ordinary outdoor outlet is suitable. All electrical work should be performed or inspected by a qualified professional who understands the relevant regulations. Cable routing, weather protection, grounding, disconnect arrangements, and the placement of controls should be determined before the walls and interior finishes are completed. Electrical components must also be suitable for the temperatures and moisture conditions in their installation locations. Planning the electrical system early can prevent costly alterations and helps ensure that the finished sauna operates as intended.
Designing the Interior Benches
The benches are among the most frequently used parts of a sauna, so their design has a direct effect on comfort and usability. Bench height, depth, spacing, and arrangement should suit the cabin dimensions and the intended number of users. Smoothly finished wood is generally preferable for seating because rough surfaces and exposed fasteners can make the experience uncomfortable. Materials should be appropriate for sauna temperatures and should not release unsuitable finishes or residues when heated. The layout must leave adequate space for safe movement and maintain the clearances required around the heater. Removable or accessible bench components can also make cleaning and maintenance easier. Before fixing the benches permanently, check the proposed seating arrangement against the actual interior dimensions and heater location. A carefully designed seating area makes the cabin feel more spacious and helps users settle comfortably during a session.
Adding Windows and Doors
Windows can bring natural light into an outdoor sauna and provide views of the garden, but they also affect privacy, heat retention, and the amount of wall space available for insulation. If you include glazing, choose products and installation details suitable for the temperature differences and conditions expected in the sauna. Door design is equally important because the entrance needs to operate reliably and allow users to exit easily. The door should be installed according to the sauna design, with suitable hardware and no locking arrangement that could trap a person inside. Its swing direction, threshold, handle, and surrounding clearance should be considered during the planning stage. Avoid adding decorative features that interfere with safe access or conflict with the heater’s required clearances. Thoughtful placement of windows and doors can improve the appearance of the structure while preserving comfort, safety, and practical use.
Roofing and Weather Protection
An outdoor sauna needs a roof that protects the structure from rain, snow, wind, and prolonged exposure to moisture. Roofing options may include suitable metal panels, shingles, or other materials compatible with the building design and local climate. The roof should have appropriate drainage, flashing around penetrations, and details that prevent water from entering the wall assembly. In areas that receive heavy snowfall, the roof structure must be designed to handle the expected loads. Gutters or other drainage features may help direct water away from the foundation when appropriate for the site. Regular inspections can identify loose roofing components, damaged flashing, or early signs of leakage before substantial damage develops. A durable roof is not simply a finishing detail; it is an essential part of protecting the investment and keeping the sauna usable through different seasons.
Estimating Materials and Construction Costs
Creating a realistic budget helps homeowners understand what the project will require before buying materials or beginning construction. Major expenses may include the foundation, framing lumber, exterior cladding, roofing, insulation, interior wood, benches, the heater, electrical work, ventilation components, doors, and any necessary permits. Site preparation, delivery, tools, professional labour, and landscaping can also affect the final amount. Costs vary substantially according to the sauna’s size, construction method, material quality, local prices, and whether the project is built from a kit or customized from scratch. A useful estimate should include a contingency for unexpected work, particularly when the ground conditions or existing utilities have not been fully assessed. Comparing supplier quotes and checking the complete specifications of each component can help prevent omissions. A lower initial price is not necessarily better value if it results in poor durability or unsuitable equipment.
DIY Construction or Professional Installation
Some homeowners enjoy building projects themselves and may be comfortable assembling a prefabricated sauna kit or completing parts of a straightforward timber structure. However, the difficulty depends on the design, the tools available, construction experience, and the complexity of the heater and utility systems. Foundation work, structural framing, weatherproofing, and electrical installation may require specialist knowledge or professional involvement. A custom sauna can also involve design decisions that are difficult to correct once the walls, insulation, and interior finish are in place. Before choosing a do-it-yourself approach, assess your skills honestly and identify which tasks must be completed by licensed or qualified professionals under local regulations. A prefabricated kit with clear instructions may simplify certain stages, while a custom project may benefit from a designer or experienced builder. The best approach is the one that meets safety requirements and produces a reliable structure.
Checking Local Building Regulations
Before starting construction, find out whether your planned sauna requires a building permit, electrical permit, zoning approval, or other authorization. Requirements can depend on the structure’s size, foundation, height, location on the property, utility connections, and whether a wood-burning heater or chimney is included. Local rules may also address distances from property boundaries, nearby buildings, fences, trees, and combustible materials. Some communities have restrictions on outdoor wood-burning appliances or seasonal fire use. It is important to check the current requirements with the relevant local authority rather than assuming that a small detached structure is automatically exempt. If the sauna is being installed in a shared or managed property, additional permissions may apply. Confirming these details before buying materials can prevent delays, fines, or expensive changes after construction has begun.
Drainage and Moisture Management
Water management around an outdoor sauna helps protect the foundation, exterior wood, and nearby landscaping. The site should direct rainwater away from the structure instead of allowing it to collect around the base. Depending on the design and local conditions, this may involve grading the ground, preparing a suitable base, or installing drainage measures. The sauna itself should also be designed to manage condensation and moisture generated during use. Interior cleaning methods, ventilation, and the materials used for the floor and walls should follow the manufacturer’s recommendations. If the design includes water exposure beyond ordinary sauna use, the floor assembly may need additional waterproofing or drainage provisions. Moisture problems can develop slowly, so regular inspection is valuable. Paying attention to water management during the planning stage can reduce the likelihood of rot, mould, and costly repairs later.
Outdoor Lighting and Pathway Design
A well-designed pathway makes it easier to reach the sauna while helping users avoid slippery or uneven ground. Choose a route that is practical from the house and suitable for the weather conditions in your area. Surfaces should provide stable footing, and the entrance should remain accessible without obstacles. Outdoor lighting can improve visibility during evening use, but fixtures and wiring must be rated for their location and installed according to applicable electrical requirements. Inside the sauna, lighting should be specifically suitable for the operating temperature and environment, with placement that provides comfortable visibility without interfering with the heater or other equipment. Avoid using ordinary indoor lights in locations where they are not rated for the conditions. Good lighting and safe pathways are easy to overlook during construction, yet they contribute significantly to the everyday convenience and safety of an outdoor sauna.
Privacy and Backyard Landscaping
Landscaping can help an outdoor sauna feel like a natural part of the backyard rather than an isolated utility structure. Plants, fencing, screens, and carefully placed seating areas may improve privacy while creating a more inviting setting. When choosing plants, consider mature height, root growth, falling leaves, and the amount of maintenance they will require near the sauna. Keep vegetation and combustible landscaping materials at the distances required by the heater and local fire-safety rules. Trees and fences should not obstruct required ventilation or access for servicing equipment. A simple path, a small changing area, or a nearby place to sit and cool down may make the overall space more practical. Plan these features alongside the sauna layout so they complement the structure without creating drainage problems or interfering with safe access.
Maintenance for Long-Term Durability
Routine maintenance helps preserve the sauna’s appearance and identify small problems before they become expensive repairs. Exterior surfaces should be inspected for signs of water penetration, damaged cladding, loose fasteners, and deterioration around doors and windows. Roofing, flashing, drainage, and the foundation should also be checked periodically. Inside the cabin, benches and other surfaces should be cleaned using suitable products and methods recommended by the manufacturer. The heater, ventilation openings, and electrical components should be inspected according to the equipment instructions, with qualified professionals handling any work that requires specialist knowledge. Wood finishes should be selected for the specific location and should not be applied to interior surfaces unless they are explicitly suitable for sauna conditions. A consistent maintenance schedule can help the structure withstand outdoor exposure and remain comfortable to use over many years.
Improving Energy Efficiency
Energy efficiency begins with a design that matches the sauna’s size to its intended use. A cabin that is unnecessarily large may require more energy to heat, while gaps in insulation or poorly fitted doors can increase heat loss. Choose a heater rated for the sauna’s actual interior volume and construction, and follow the manufacturer’s operating guidance. Proper insulation, suitable door seals, and careful control of ventilation can support efficient operation without compromising air quality or safety. Avoid adding insulation or vapour-control layers without understanding how they interact with the complete wall assembly. If the sauna is used frequently, compare heater power ratings and estimate electricity costs based on local rates and typical session lengths. Small design decisions made before construction can influence ongoing costs more effectively than trying to correct an inefficient structure after it has been completed.
Common Outdoor Sauna Building Mistakes
One common mistake is beginning construction before confirming the site conditions, required permits, and heater specifications. This can lead to a foundation that does not fit the cabin, insufficient electrical capacity, or a layout that fails to provide the required equipment clearances. Other problems include inadequate drainage, unsuitable wood, poorly detailed roofing, insufficient insulation, and ventilation openings placed without reference to the sauna design. Homeowners may also underestimate the space needed for safe access, maintenance, and entry during wet or cold weather. Using materials intended for ordinary indoor spaces can create additional problems when exposed to sauna temperatures and moisture. A detailed plan, accurate measurements, manufacturer-approved components, and professional input where needed can help avoid these issues. It is usually less expensive to solve a design problem on paper than to rebuild a finished section of the structure.
Finalizing Your Outdoor Sauna Project
Before construction begins, review the entire project from the foundation to the roof and confirm that each component works with the chosen sauna design. Check the dimensions, seating layout, heater capacity, ventilation plan, insulation system, electrical requirements, access route, and drainage arrangements. Make sure the materials are suitable for their intended locations and that the installation follows applicable building and fire-safety rules. Keep product manuals and warranty information available for future maintenance, and arrange professional inspections where required. A carefully planned project can provide a dedicated outdoor retreat without unnecessary construction complications. Chinook Hot Tubs and Saunas encourages homeowners to explore suitable sauna designs, compare quality equipment, and plan each part of the installation carefully so their outdoor sauna can provide a comfortable, practical, and enjoyable addition to their home.